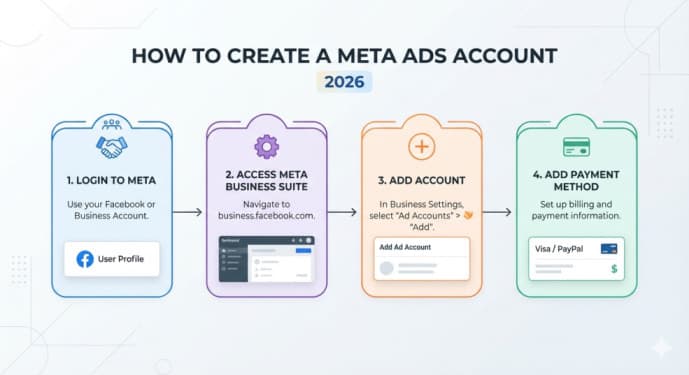
TL;DR: You must create a Facebook Business Page before you can run any Meta ads. That Page becomes the advertiser identity on all your campaigns. Once your Page exists, access the business portfolio (Meta's renamed Business Manager), go to Business Settings, and request your ad account there, not through Meta Business Suite. Meta approves accounts in most regions immediately, though some countries require business verification first.
You cannot just sign up and start running Meta ads. Meta requires a Facebook Business Page before you create an ad account. No Page, no ads. This single requirement cost my team two days of back-and-forth with a client before we figured out what was blocking them. I have not let it catch anyone off guard since.
Why Your Facebook Business Page is Non-Negotiable
Meta's advertising system does not work the way most new advertisers assume it works. You do not run ads from your personal Facebook profile. You run ads on behalf of a Page. When someone sees your ad in their Instagram feed or Facebook story, they see a Page name and profile picture, not your personal details.
This applies to every placement. Facebook feed ads, Facebook Stories, Instagram feed, Instagram Stories, Instagram Reels, Messenger ads, even the Audience Network. Every single ad that runs on Meta's platforms needs a Facebook Page behind it. That is the foundation the entire advertising system sits on. Even if you only want Instagram ad placements, a Facebook Page is still required.
This is not a new requirement. It has not changed. What changed is where you actually create the ad account. Meta renamed what used to be called Business Manager to a "business portfolio," and that is where ad account creation happens now. Older guides point you to Meta Business Suite. That is outdated.
Your Prerequisites Checklist Before Setup
Get these four things in place before you open Ads Manager. Skipping any one of them creates friction you do not need.
A Personal Facebook Account
This is your login credential. Your personal account is what owns and administers Pages, but your Page is what actually runs the ads. If you do not have a Facebook account yet, go to facebook.com and create one first. This takes five minutes.
A Facebook Business Page or a Role on One
This is the step most people miss. Meta specifically requires either your own Facebook Business Page or an admin, editor, or advertiser role on someone else's Page before it will let you set up a Meta ads account. If you do not have a Page yet, create a Facebook page using our step-by-step guide. A Business Page is different from a personal profile.. Personal profiles cannot run ads. Pages are what Meta uses to display your brand identity when your ads appear in someone's feed.
A Valid Payment Method
Meta charges you for ad spend. Have a credit card, debit card, or PayPal account ready. You add this during the account creation process. Meta places a small temporary charge on the card to verify it works. That charge disappears within a few days.
Business Information and Documentation
You will need your business name, address, and website if you have one. In the United States, this is usually sufficient. However, some countries require a government-issued business license before Meta approves your account. Check your local requirements before you start the setup. Knowing this ahead of time saves you the frustration of hitting a verification wall halfway through.
The Current Account Creation Flow
Go to business.facebook.com. This is your business portfolio home. Set up or open your existing business portfolio. This replaced what used to be Business Manager.
Open Business Settings. This is where ad account creation actually happens now. Most guides still point you to Meta Business Suite, but that is not where you request new ad accounts anymore.
Find Ad Account Status. The exact menu path depends on your view, but you are looking for either "Accounts" or "Ad Accounts." This is where you request a new ad account.
Fill in advertiser details. Your business name, address, and other identifying information. Meta uses this to verify who is actually behind the account.
Set your ad account name. Use your business name so it is easy to identify later. You cannot change this after creation.
Choose your time zone. Pick where your audience is located. This controls when daily budgets reset and cannot be changed later. This is a permanent setting.
Select your currency. Choose carefully. Once your ad account currency is set, it is locked in. If you need a different currency later, please create a new ad account. This is one of the most expensive mistakes to make at account setup.
Select your Facebook Business Page. This is the Page your ads will run on behalf of. You must have this Page before you reach this step.
Submit for approval. In most regions, your account activates immediately. In some countries, Meta reviews your submission before approving it. This is especially common if you plan to run ads in regulated categories like housing, credit, employment, or political content.
Add your payment method. Go to Payment Settings and add your card, PayPal, or bank account. Meta verifies the payment method with a small temporary charge.
Once your account is approved, you can start creating campaigns. However, one permanent constraint exists. Once an ad account is created inside a specific business portfolio, it cannot be transferred to a different business portfolio later. If you are setting this up for a client or a team you might restructure later, get the portfolio structure right the first time. There is no moving an existing ad account.
Do Not Overlook Instagram Connection
Having a Facebook Business Page does not automatically link your Instagram account for advertising purposes. You need a separate connection step. Without it, you can only run ads on Facebook placements.
If you want Instagram feed ads, stories ads, or reels ads, you must connect your Instagram account to your Facebook Business Page. This happens inside your Page settings, not inside Ads Manager. Once connected, you can select Instagram placements when you build campaigns. You can also manage Instagram DMs from Meta Business Suite and see unified analytics across both platforms.
Most new advertisers build their account and then wonder why Instagram placements are not available to select. The connection step is where that gets fixed.
Frequently Asked Questions
Do I really need a Facebook Page to run Instagram ads?
Yes. Meta's entire ad system runs through Facebook Pages. Even if you only want Instagram placements, a Business Page is required as the advertiser identity behind your campaigns. This is not changing.
Can I use my personal Facebook profile to run ads?
No. Personal profiles cannot run ads. Meta requires a Business Page to serve as the brand identity on all ad placements. This is a hard requirement, not a suggestion.
What happens if I set the wrong currency?
You cannot change it. Once your ad account currency is locked in, the only way to use a different currency is to create an entirely new ad account from scratch. Choose carefully before you submit your account creation request.
Can I transfer my ad account to a different business portfolio later?
No, ad accounts stay tied to the business portfolio they were created in. Plan your portfolio structure before you create the account. If you are working with a team or managing multiple clients, think through who needs access and how before you finalize the setup.
How long does account approval take?
Most accounts activate immediately, but this varies by region and business type. If Meta needs to verify your business, especially for restricted ad categories or countries that require licensing documentation, approval can take several business days. New payment methods sometimes trigger a brief review as well.
Do I need the Meta Pixel to run ads?
You can run ads without it, but you should not. If you are driving traffic to a website, the Meta Pixel tracks what happens on your site after someone clicks your ad. This data helps Meta optimize your campaigns. Without it, you are essentially flying blind. Install it before you spend real money.
What to Do Immediately After Account Approval
Your account is live. Do not spend money yet. A few critical steps come first.
Pick a clear campaign objective. When you open Ads Manager and create your first campaign, Meta asks you what you want to achieve. Are you driving traffic? Generating leads? Building awareness? Match the objective to your actual business goal. This determines how Meta's algorithm optimizes your spending.
Budget conservatively at first. Test with small daily amounts until you understand what is working. Most new accounts have spending limits or review holds while Meta assesses your account activity. Start with $5 to $10 per day to build account history before you scale.
Install the Meta Pixel if you have a website. Do this before you launch your first campaign. The Pixel is a code snippet that tracks conversions, page views, and user behavior on your site. Meta uses this data to optimize your ads and measure what actually works.
You now have the foundation. The next step is building your first campaign strategy, setting your audience, and deciding where your budget goes. The account setup is the straightforward part. Strategy is where your results actually come from.